3D Models and Toys
UFO’s, Spaceships Flash Gordon Rockets Drone Command Center NEXRAD Radar System
Adding New Items Daily All Items produced in-house With our Mini 3D print farm
Variety of Decals
Custom Vinyl Decals
& More
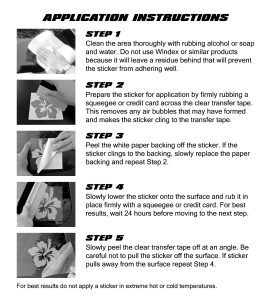
View & Print Installation Instructions
Vinyl Decals – Large & Small
Please note this is not a window cling or printed decal.
It does not have a background, which means the decal will require a different installation process.
Temperatures affect the decal. Do not apply in direct sunlight or when the surface is too hot, as decal may bubble. If this occurs simply use a pin and puncture the bubble.
Min application temperature above 46 degrees F is required.
If the decal does not release from the backing paper, gently buff the decal until it adheres to the transfer tape. Temperature changes can cause this issue.
Once the decal touches the mounting surface it can’t be removed.
Small Decal Application
STEP 1 Prepare the decal for application by firmly rubbing a squeegee or credit card across the clear transfer tape. This removes any air bubbles that may have formed and makes the decal cling to the transfer tape.
STEP 2 Clean the area with rubbing alcohol or soap and water. *** Do not use Windex. *** Allow area to dry before application. Place the decal in the desired location with a piece of masking tape on the top of the decal to hold it in place.
STEP 3
Slowly peel off the backing layer from the decal. Only the vinyl and the clear transfer tape should remain.
STEP 4
Slowly lower the decal and rub it in place with a squeegee or credit card. Start at the top middle and then the outer edges. Firmly rub the sticker in place to make sure there is no air trapped under the decal. If this occurs simply use a pin and puncture the bubble.
STEP 5
Slowly peel the clear transfer tape off at an angle. Be careful not to pull the decal off the surface. If the decal pulls away from the surface repeat step 4. ONLY the vinyl decal should remain.
Things to know before you apply your decal
Temperature effects the decal. Do NOT apply in direct sunlight or when surface is hot, as decal may bubble. If this occurs simply use a pin and puncture the bubble.
Minimum application temperature above 460 F. is required.
If the decal does NOT release from the backing paper, gently buff the decal until it adheres to the transfer tape. Temperature changes can cause this issue.
Use of products containing waxes, Rain-X or other silicone polymer additives will prevent your decal from sticking.
Once the decal touches the mounting surface it cannot be removed!
Some electronics such as phones and computers are coated with nano particles to prevent figure prints. Your decal may NOT adhere to these surfaces.
If you have any questions or concerns, please contact our customer service.
Vinyl decals, 3D Printing & more find us at these three locations
How to Install a Decal
Step-by-Step Instructions
1. Prepare the Surface
Clean the area thoroughly using soap and water or isopropyl alcohol.
Dry the surface completely with a lint-free cloth.
Ensure the surface is smooth, dust-free, and at room temperature (ideally between 60–80°F or 15–27°C).
2. Position the Decal
Without removing the backing, place the decal where you want it.
Use masking tape to hold it in place or create a hinge at the top edge to keep alignment steady.
Step back and visually confirm the placement before proceeding.
3. Peel the Backing
Slowly peel the backing paper away from the decal, starting from one corner.
Make sure the decal remains attached to the transfer tape (the clear top layer).
Avoid touching the adhesive side to prevent contamination from oils or dust.
4. Apply the Decal
Starting from the top, press the decal onto the surface using a squeegee, credit card, or your fingers.
Work from the center outward to eliminate air bubbles.
Apply firm, even pressure across the entire decal.
5. Remove the Transfer Tape
Wait a few minutes to allow the adhesive to bond.
Slowly peel the transfer tape back at a sharp angle, keeping it close to the surface.
If any part of the decal lifts, press it back down and wait a bit longer before retrying.
6. Final Touches
Smooth out any remaining bubbles with a soft cloth or use a pin to release trapped air.
Avoid washing or exposing the decal to extreme conditions for 24 to 48 hours to ensure proper adhesion.
Culturing Vinegar Eels
Vinegar eels are tiny roundworms that live in vinegar and are a good live food for small
fish fry. To start a vinegar eel culture, you need:
• A starter culture of vinegar eels.
• A container with a long neck (like a wine bottle).
• Apple cider vinegar (enough to fill half of each container)
• An apple
• Dechlorinated tap water
• Filter floss or polyester fiber fill
• Paper towels and rubber bands
• A pipette
Here are the steps to follow:
1. Cut the apple into thin slices and put four to eight slices in each container.
2. Divide the vinegar eel starter culture into each container.
3. Fill the rest of the containers with 50% vinegar and 50% dechlorinated tap water,
leaving some space at the top for air.
4. Cover the container openings with paper towels secured with rubber bands.
5. Store the containers at room temperature in a dark place.
The wine bottle is your primary culture that you can harvest from, and the larger
container is your backup culture in case anything happens to the wine bottle. It takes
about 2 to 4 weeks for the vinegar eels to multiply, and they can last for months without
any additional feedings.
To harvest the vinegar eels, use a pipette to suck up some liquid from the wine bottle,
avoiding the apple slices. Then squeeze the liquid through a piece of filter floss or
polyester fiber fill into a small container of dechlorinated water. The vinegar eels will
pass through the filter and collect in the water, while the vinegar will be absorbed by the
filter. You can then use another pipette to feed the vinegar eels to your fish fry.